Tuesday, August 18, 2015

Pita Breads - TWD: Baking with Julia

Tuesdays with Dorie: Baking with Julia - 87th installment. The recipe is Pita Breads.
I opened the book to the recipe for this week, Pita Breads, and found notes I had made from a previous time.  I think I must have baked this at the time I first got the book - I remember being fascinated by the video, seeing the way they puffed in the oven (more on that later....)
Sponge after rising and mixing in salt and olive oil
This recipe was very simple, although it needs time to rise.  You mix up a sponge using yeast, water, and whole wheat flour, and let that sit for 30 minutes to eight hours.  In this case, I didn't have eight hours, so I left it for three hours.  Once it's had time to sit, you stir in salt and olive oil, followed by all-purpose flour, and then a good 10 minutes of kneading. 


The dough rises for 2-3 hours, and then it's time to roll it out.  The batch of dough makes 16 breads, each about 6" or more.  You need to roll it fairly thin, but thanks to the long rising, kneading, and oil, this dough is fairly sturdy, and just needed a little flour to help keep it from sticking.  


I baked the rounds on the pizza stone, at 450 degrees, for just 3-5 minutes.  And I remember this from last time - some of them puffed wonderfully, and some did not.  I would love to know the secret of this so I can get it right every time!
We ate this bread wrapped around greek-flavored lamb and vegetables, and it was still good the next day for breakfast and lunch.  I stored it in a plastic bag to keep it soft.  Very good!  I would make this one again, although if anyone out there has got the secret to puffing pita bread, I want to hear it :-)


Sunday, August 9, 2015

Miniature Florentine Squares - TWD: Baking with Julia

Tuesdays with Dorie: Baking with Julia - 86th installment. The recipe is Minature Florentine Squares and/or Glazed Mini Rounds.
I almost got whiplash, going from Swedish Oatmeal Hardtack to these petit four-type pastries.  The surprise this week was how simple these actually were!   The pastries were really delicious, and it was fun to make mini cakes in two shapes, each of which had a different filling. 
These were two different variations on a tiny pastry, using the same cake as a base.  You bake a square or round cake out of Ladyfinger Genoise, which (apparently) is one of the sturdier Genoise recipes. It's the same batter you use to pipe out ladyfingers, and contained 2 eggs and 4 yolks, all within this 9" layer of cake.  It includes the step of beating air into the eggs+yolks until they "form a ribbon" - I have thought my ladyfingers were a bit flat in the past, so I took some extra time with this step to make sure the batter was really thick enough.  I wanted to try both shapes, so I baked a square (9") cake, and split it in two parts.
Once the cake is cooled, you split it horizontally into two thinner layers - I cut mine in half before that, so one half is designated for squares and one half for rounds.


Separate the two layers, and then brush the bottom layer of cake lightly with a mixture of sweet wine and sugar (I used an Apple "Ice Wine" that we bought locally).  Next, you spread on a layer of preserves, which had been pushed through a strainer to make it smooth (fussy, but I could see the reason for it).  The squares got red current jelly and the rounds got apricot preserves.


Put the top layer back on, so the preserves are now sandwiched in the middle.  The next step for the rounds is to cut 1 1/2" circles out of the cake (cutting rounds out of a rectangle left me with some cake scraps - really difficult to figure out what to do with those :-).  For both shapes, you apply a glaze made of white chocolate which has been melted by mixing in heavy cream which you've heated up. The white chocolate is so easily melted that you just pour the cream over and stir for a while, and you've got your glaze.  Spread the glaze over the rectangle cake, just on top, not worrying if a little drips.  For the rounds, you glaze each one individually, by putting some on the top and letting it run down the sides.  A bit more fussy, and my rounds don't look quite as polished as those in the cook book.  Once nice technique suggestion in the book was to put wax paper or parchment below, and scrape the dripped glaze up, push it through a strainer, and then use it to finish your glazing step - definitely less waste that way. 

At this point, you decorate and finish.  On the florentine squares, you pipe some chocolate in lines, lengthwise, and then draw an implement with thin points (I used a fork, but something as thin as a skewer would be better) crosswise to give the marbled appearance.  Once you've marbled the entire rectangle, you cut small squares out of it, using a very sharp knife and wiping it off between cuts to keep it as neat as possible.    With respect to the chocolate lines, the recipe called for melted milk and dark chocolates in alternating lines. My attempt to melt milk chocolate was a complete bust.  I tried to melt it in the microwave, and it just seized up and became hard and granular.  Applying more heat didn't help, and part of it actually burned.  I think my microwave method for semisweet chocolate (50% power for 2 minutes, checking and stirring as you go) needs some refinement when used for milk chocolate.  Having messed that up, I had no milk chocolate left, so I just piped dark chocolate.

The rounds get piped with lines or dots of chocolate, and decorated with candied violets.  I skipped that ingredient, although if we'd had violets in the yard, I might have been crazy enough to try candying them :-).


Swedish Oatmeal Hardtack - TWD: Baking with Julia

Tuesdays with Dorie: Baking with Julia - 85th installment. The recipe is Swedish Oatmeal Hardtack.
(Running late on this blog - I'm getting the baking done with the BWD group schedule, but not the blogging :-)
This recipe made a nice 'oatey', slightly sweet cracker, and I loved the change of pace of making something with very few ingredients.  They include shortening, butter, sugar, oats, flour and buttermilk, with a little salt and baking soda.
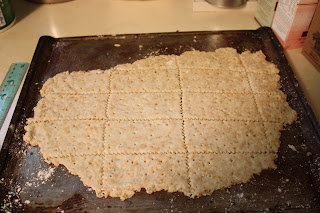
The method was quite simple - cream the shortening, butter and sugar, and then add the mixed dry ingredients plus buttermilk.  You chill for a half hour, and then roll out the dough on a greased cookie sheet.  I got a thickness of between 1/8 and 1/4 inch.


"Pebble" the dough with a hardtack rolling pin (ok, didn't have one of those :-) or a fork, use a pastry wheel to cut the dough into rectangles, and then bake for a total of about 10 minutes.


You need to watch carefully to be sure they don't overbrown - even rolling helps it brown evening, but inevitably, the edges get a little browner, which I like.    I will definitely make these again - they were wonderful with cheese, soup, salad, or by themselves as a snack.  I might try rolling them slightly thinner, as the middle pieces were more flaky/chewy than crisp, and I liked the crunchy parts the best, both for flavor and texture.